Showing posts with label Decor. Show all posts
4.11.2016
Room Names- Lino Block Cuts
Slowly but surely I am plugging away at my latest project.
Very slowly.
In January I began the drawings, February I carved and printed two, March I painted a bit and now it's April and my work out of the home has me completely consumed.
So they sit on the rack.
This is going to be a series of 6 lino block prints of varied leaves. Each represents a room in my home and will be hung outside with the rest for purchase in the shop This one is for El's room since it looks out over the copper beech tree.
I show here only a small test for the color but there will be a background added as I go.
So, 2 down, 4 to go. I'll keep you posted.
Follow all the progress on my artwork, the home and the other fun stuff we are up to on IG at lizhp1
4.04.2016
Crafty Accountability
Every Fall Mark and I sit down and have a vision casting session. I do this when we are on a trip so there are no household distractions. When you're away from your regular day to day chores, the big picture seems so much clearer.
Now, this is not just any old 10-point list. This is a massive list divided into sections; Home Improvements(this is a three phase, micro list), Family Fun and Financial Goals.
With all of those things to focus on there is little time to focus on the fixer-upper projects and artwork to-dos. My sister Angie at Dear Spring Green and I were lamenting about this at our last show in Vancouver and we decided to start a Facebook accountability group. We simply write out our realistic goals at the beginning of the month and then post progress as we go. When the next month roles around we write what we accomplished and either roll over our old goals to the next month or write a new list. No pressure and lots of support and inspiration from others.
And that brings me to Ugly Orange Chair. That is her name.
I purchased her months ago from Saint Vincent's and it was love at first sight. Mark thought I was joking. I just loved her low elegant lines, her cozy seat and all of her glorious orangeness.
She was the kind of chair that people would wince at when they walked into my office. No one would sit in her because (although she was clean) she looked dirty. So the orange had to go.
So after making my list for March I turned from my computer, squared her up, and went to work. It was a combination of inspiration, and the fact that I had a rare 6 hours without anyone home to bother me.
Just the week before I was mentioning that I needed to buy a drop cloth for her when a friend of ours overheard and graciously gave me some remnants he had leftover from a photography project. I literally only had a few inches of scrap leftover when I finished. It was perfect!
Where I was short fabric I substituted this yellow and cream houndstooth fabric I had on hand. No one can see it under the seat cushion but it delights me to know it's there.
Slipcovers used to intimidate me but after this one, with it's confusing arms and slopes, I feel I could take on anything. No tips or tricks needed really. Just pin up the fabric, trace, cut and pin inside out and repeat. I decided not to taper the back and created a flap to simplify it. No one will see her backside where I have her anyway.
The pillow case was one I found from Pottery Barn on clearance for only $19. I hate to use the word "perfect" so many times but it really did work out perfectly. Now people come in and make themselves at home. I guess I'll need to change her name now.
I really don't think this would have happened unless I had my little accountability group so create one today with your close friends or family!
2.05.2015
Spare Room Stencil
This March we will be experimenting with our home and our capacity to be a B&B. We both have the desire to do this and now that our youngest is almost out of high school I think it's a good idea to figure out if it is really for us. My brother-in-law is bringing four colleagues with him next month for a conference. We will host...and see.
I jumped at the news and immediately went to work on the worst room; the schizophrenic room. This room has now been three colors with no real vision.
The first color was just a basic light brown. We chose it for most of the rooms because it was a great neutral and went well with the green carpet Mark chose. Now, I know that looking at this photo and the one below it, they look alike. Be assured that the new paint is WAY different. More grey-brown and less green-brown
about 2 years ago the room was transformed to a soft yellow that turned out to only be "soft" for a few hours of the day. With three skylights and two windows this tiny room has quite the brilliant southwestern lighting .
Every time I found items I loved, I would toss them in there thinking that one day all of these colors would magically go together because I loved them all equally. This is not a good idea. This is the mentality of a newbie hoarder. But a hoarder with fantastic style.
So away went the yellow and in came Chiffon by Evolution through Miller Paint. I chose this to match the bed spread I finally settled on. Originally I chose this for my bedroom but because we are upgrading to a king I am forced to give it up to another room. I posted about it when I changed my bedroom color to compliment it HERE.
I then searched for a William Morris type wallpaper but couldn't find one I liked under $130 a roll. Though I was only doing one wall, it would take three rolls!!
So I went with a stencil by Royal Design that cost $99. Plus they send you a free stencil of the month that I'm sure I can use on a future project.
Because I was wanted the pattern to stop at the corner without a distinctive stencil line, I started the pattern just a foot or so away from the corner and worked my way up.
It takes 2 large stencils to make the pattern. They are clearly marked A and B with a few repeats that you can line up with the stencil you just painted. This also allows the stencil a second to dry as you alternate.
When doing corners make sure you have it taped well to the adjoining wall so your pattern is even when you use your stencil brush to paint it in. If you rely on stencil spray it can get wonky.
A few things I learned about stenciling:
1. Go ahead and spend the $13 on a stencil leveler. I didn't and it was a hassle the entire time. It is money well spend and you can always use it on another project or just sell it on ebay when you are through.
2. Evolution is a thick paint! Though it goes on beautifully, it builds up on the stencil and makes it quite heavy and awkward to deal with. This may not be the case with other paints but when doing such a huge, vaulted wall I should have washed it off half way through.
3. You can use stencil spray on the back but tape works just as well.
4. Do it in a well lit room without sunlight spreading in. As you can see from above, the light coming in from the window washes it all out and makes it difficult to align your pattern. I ended up working on one side of the wall, moving up rather then across, until the sun was no longer in the way. Curtains would have helped but I had to take them down to paint the room.
5. Only use foam. My foam roller was wonderful and I only used one roller for the whole wall. The stenciling brush has a different constancy and coverage so I just used the basic 1" foam brush to dab in corners and it was perfect and cheap!
Now, this room is almost complete! I just have one wall to get a small table or dresser for and I am done...that is until we add the built ins. But those can wait.
![]() |
Mirror was found at a garage sale for $15 years ago. I knew some day it would find a home!
|
![]() |
The bed's and nightstands were made by Mark. I'm not allowed to buy anything made of wood :) |
![]() |
The small wall under the skylights will some day be built-ins but until then it is just the backdrop to a small bookshelf. |
What transformations are you creating during these cold and wet winter months?
3.18.2014
Master Bedroom Part #1: New Paint
Busy weekend here! As soon as the sun is out Mark is out in the garden or field tearing something up and I am inside doing the same.
I love gingkoes and picked this little dish up at Lone Crow Bungalow in Bend OR. It's our favorite shop when we visit (you can shop there online now as well) The lamp shades are really cool and made out of some sort of thin rope but they are getting tattered and old so this will soon be replaces. The dear is Buck. For some of you this might freak you out but he is really quite beautiful not at all creepy in person.
![]() |
Not a picture of this weekend :) This is early in the bedroom-building stages. |
For months I have been gathering inspiration for our master bedroom. When we moved in, color choices were based on Mark's love for all things green and all of the rooms are just that, with the exception of a few brown ones. So, because he worked so hard to make this house possible with his blood and sweat, I went with the one he liked; Army Green. At first I thought "This is a bold color. I shall accessorize and make it work" But I was never inspired by it and collected the things with colors and textures I loved instead.
I love gingkoes and picked this little dish up at Lone Crow Bungalow in Bend OR. It's our favorite shop when we visit (you can shop there online now as well) The lamp shades are really cool and made out of some sort of thin rope but they are getting tattered and old so this will soon be replaces. The dear is Buck. For some of you this might freak you out but he is really quite beautiful not at all creepy in person.
The chair came from a private residence called Soho, on Silcox Island in the middle of the American Lake and was been passed down through the family to Mark. It is so lovely and old. He uses it for his clothes. The center pic of the fabric on a chair (my clothes chair) in the room we did a trade for. Love the lines but some day it would be nice to redo it in a linen. Then there are the vintage suitcases with an awesome red tone to the leather and our laundry basket. I admit I have an obsession with well made, large baskets. I have several but they are all from thrifting so that makes it OK…right?
A set of cloud paintings I found for $7 ea at St Vin! |
As you can see, we dont' have a bedroom , or a singe room for that matter, that has a "set" of furniture. We collect things we love and go from there. It may take longer to complete our home this way but there isn't really any fun in being done :) I should also say that I am not allowed to buy any furniture made of wood. Mark builds everything you see here.
I didn't start this post with decor in mind though. I wanted to show that the oppressive green is now gone but I thought you might want to see what I'm working with so future posts make sense.
My one PB luxury for this room |
But first you must know how much I love Pottery Barn. This is important. My inspiration is found all over the place and my taste can be described the same, but every time the PB catalogue comes I giggle to myself then plan a time we can run away together so I can enjoy every single page while sipping a cup of tea. Most of the time the things I love/want are just the props and not even for sale.
![]() |
Image courtesy of Pottery Barn 2013 Holiday Catalogue |
I really wanted a dark paint again because it is a pretty light filled room and even if the green was a bit dreary, at least it was soothing at night. I also wanted to go with a blue grey. I tried a few but when I saw this picture in pottery barn I had to get something close to it. So I mixed away in my laboratory (kitchen) and concocted the perfect blend. I call it "Stealhead"
So here is the before….
Oh the green-ness of it all!
The tape was to see what shape the wall paneling would take but in the end I decided that it would shrink the room. Because of the vaulted ceilings it seems bigger then it is. Covering the walls in wood would ruin the illusion. Instead we are going to make faux beams on the ceiling to add more texture and bring the eye up!
And the after….
It is so much better and looks different on every wall, at every hour of the day. I LOVE IT!
I started with a couple blue/grey colors that didn't quite work and after mixing them along with the original green color this is what I cam up with. In tis picture it looks really light but when holding the PB pic up to it they seem to be almost an identical match.
I love me a dynamic paint color! See how rich it looks in the photo below. It's about 4pm here and it is a lovely jewel tone when above (around 2pm) it is light and fun.
I learned a couple of things during the process.
1. Picking out swatches and taping them up on your wall is all well and good for a space you won't be "living in" like a hallway but taking the time to buy samples and painting LARGE pieces of wall is well worth it. Even if it drives your husband crazy.
2. Mixing colors is the way to go. It is a bit time intensive but worth it if you have a specific one in mind.
I took two colors I bought in sample size that didn't do it for me. One was too grey, one was too blue so I covered small dessert bowls in clear wrap and mixed away. After about 4 different swatches I mixed a new bowl with the existing green from the room and messed with the ratio for a while. Each time I made a new color, I lifted the remaining paint covered clear wrap out of the bowl to let dry as well.
After about a week of living with the colors I chose one and was able to bring in my little swatch of clear wrap and toss the rest. Pretty clean and easy!
Mark will be building a few pieces to finish out the room and I'm pretty excited to have things wrapping up and to show you all as we move along.
Up next: Painting the bathroom of course!
12.11.2013
Holiday Decor Tour
It's Christmas time here and though it took me days and days I finally filled the place with cheer and lots of sappy holiday music. Ready for a mini tour? Great, walk this way.
As you have noticed from our sign Mark and I put quite a bit of time into the planing and production of it. Doesn't it look lovely in the snow?
The story behind my title is a bit silly. Yes I am and artist and designer but visionary you ask. Well, while watching that video on the book "The Secret" there was one man in particular that had the title of "visionary" under his name when he came on screen to speak. We thought it was hilarious that someone could just randomly put that as their job title. I mean, how do you get your degree in such a thing? So we felt it fitting with my creative ability, and because there was room left to carve on my board, that I be the visionary of the family.
As you enter the front door you are greeted by a tiny little gold reindeer offering you peppermint M&M's and a giant basket full of cushy, fluffy socks. We want all of our guests to feel cozy in the winter and they are also excellent to slide around in on the wood floors.
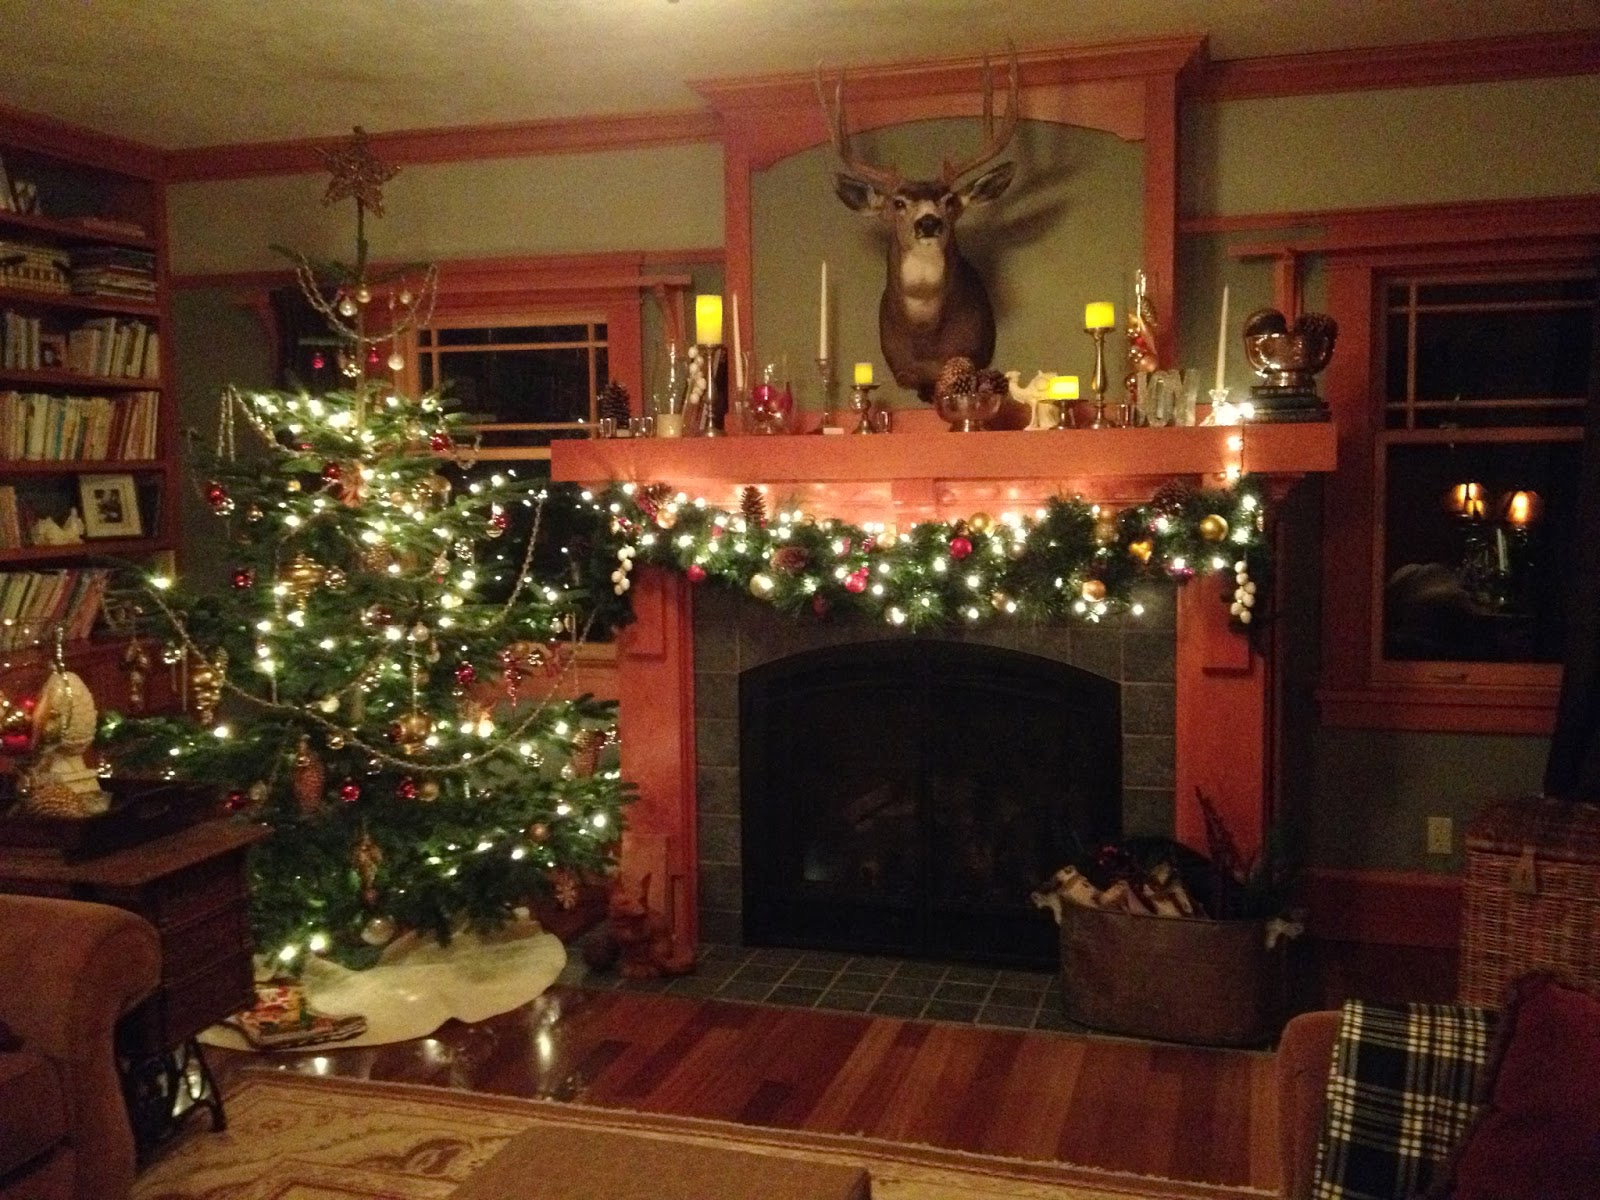
In the living room I made a garland inspired by the ones I saw in Disnyland's Critter Country. It is made with a chicken wire form with garlands wrapped around it. During the day it is very country looking but at night it is very warm and fun. And boy is it light! Not sure about storage yet but I'll think of something.
Another favorite thing of mine to do is to fill glass vases with ornaments and other curiosities. This year I used tiny LED lights on a timer to wrap around the ornaments and some wicker balls I found at Ross. The lights I get at Fine Consign in Coburg. It's a 9' strand and they are water resistant so you can put them on your front door wreath too.

It is probably the last year we will be abel to cut a tree from our own land sadly. I stopped at a tree farm to see how much it would cost and I almost had a heart attack! We are in the Pacific Northwest for goodness sakes! $50-100 for a tree?!?!! It's not like they are exotics to this area!
I digress.
And back to the tour....
And these are just a few of the amazing amarilis I grow each year.
OK, I'm a liar.
I used to but I am not the best at watering my indoor plants. This has been a hard fact to embrace about myself but I have. 75% of the plants in my home are fake. There. I said it.
Alson notice the GIANT bowls of M&M's. In my excitement for the holiday season I bought something like 5 bags but after the first ten pieces you sort of have your fill. Whatever happened to the cinnamon flavored ones they had the last 2 years? I was riffling through the shelves at Target like a crack addict looking for them.
And back to the tour....
Above the piano that no one plays is more garland and candles in front of the vintage window frame that Mark put mirror in for me. It is a lovely and heavy thing. I should know, it fell on me while decorating it the other day.
On the book shelves I love to fill with little sparkelies and misc. This year I have my Merry and Bright design on Chalkboard. Don't worry; it's colored pencil so it won't rub off. Thinking of doing a few more larger and elaborate ones for Easter and fall
And you guessed it; More fake amaryllis! But this time on our kitchen breakfast table with our advent candles around it.
Mark's mom introduced me to the idea of collecting all of my children's Christmas books into a basket each year and having them out for the kids to read. She gives us a new one each year. It's a wonderful tradition.
Sorry for the dim picture but this is all I could get with my camera.
Our tree this year with Henry the deer keeping watch over the room.
Thank you for joining me on this brief tour. There will be more to come next week.
As soon as this ice and snow melts away I'll be able to get into town for the oasis I need to finish my dining room center piece. In my head it looks fantastic....not sure how to make it a reality just yet but don't worry, I do this all the time. I'm a visionary.
12.07.2013
A Wintery Wonderland Sort of Weekend
So when they predict snow in the valley it's not only the kids who get excited. I LOVE the snow. The sheep not so much.
Mark woke me up around 5 am and I couldn't help waking El. It's the one time of year that waking a teenager at the crack of dawn is allowed.
Since school was already out and Mark couldn't really go into work, we took the opportunity to deliver the wreaths we made to our neighbors.
Rocco came too. Ate some snow. Had a good time.
So I have spent the last two days cleaning and decorating. I'm the kind of person that has to do a deep cleaning before putting anything new out. That is why it has taken almost two full days.
The reason I say almost is because Mark and I take breaks to read a chapter here and there from Mockingjay. We read the series years ago but it's always good to brush up don't you think. Paired with a warm cup of tea and the bright snow filling the house with light, it was the perfect day.
So stay tuned for fun pick of the house filled with season cheer. And oooh and awh over it because it has taken a lot of time and energy.
Subscribe to:
Posts (Atom)